How to Install MySQL on Ubuntu

MySQL is one of the most popular open-source relational database management systems, widely used for web applications and services. In this tutorial, I’ll walk you through the process of installing and configuring MySQL on an Ubuntu server. Whether you’re setting up a new web application or managing databases for an existing project, this step-by-step guide will help you get MySQL up and running quickly.
What is MySQL?
MySQL is an open-source relational database management system (RDBMS) that allows you to store, manage, and retrieve data efficiently. It supports a wide range of applications, from small websites to large-scale enterprise systems. With its robust features, including data security, scalability, and high availability, MySQL is the go-to choice for many developers and organizations.
Prerequisites
Before you start the installation, ensure you have:
- A server or computer running Ubuntu
- Root access or a user account with sudo privileges
- An internet connection to download the required packages
Step 1: Update Your System
Before installing any new software, it’s good practice to update your package index to ensure you have access to the latest versions of available software:
sudo apt update
sudo apt upgrade
Step 2: Install MySQL Server
Now, it’s time to install the MySQL server. Run the following command to install MySQL:
sudo apt install mysql-server
This command installs the MySQL server package and its dependencies. During the installation, you may be prompted to confirm the installation by typing “Y” and pressing Enter.
Step 3: Secure Your MySQL Installation
After the installation is complete, it’s essential to secure your MySQL installation. MySQL comes with a built-in security script that helps you enhance the security of your MySQL server. Run the following command:
sudo mysql_secure_installation
You’ll be prompted with several questions. Its is recommended to type yes to all of the questions.
- Set up the VALIDATE PASSWORD plugin: You can choose to enable this feature to enforce strong passwords. If you do, select the level of password validation (low, medium, or strong).
- Set a root password: If prompted, set a strong password for the MySQL root user.
- Remove anonymous users: Type Y to remove anonymous users.
- Disallow root login remotely: Type Y to prevent root logins from remote machines.
- Remove test database: Type Y to remove the test database.
- Reload privilege tables: Type Y to reload privilege tables and apply the changes.
Answer these prompts according to your security needs, and you’ll have a more secure MySQL installation.
Step 4: Start and Enable MySQL
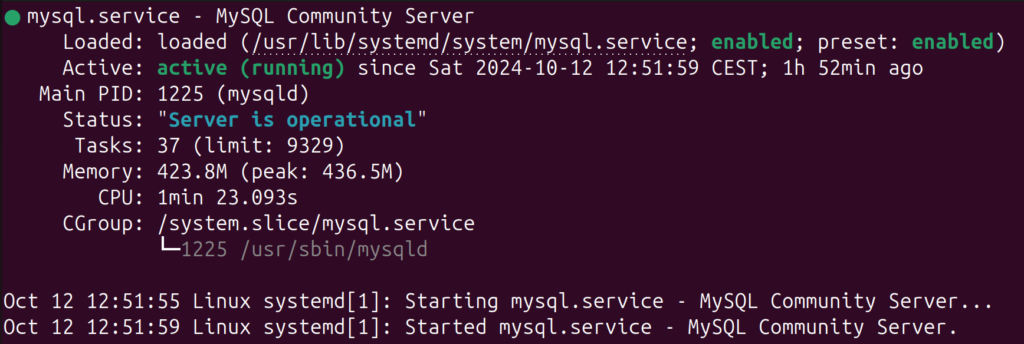
By default, MySQL should start automatically after installation. You can verify its status by running:
sudo systemctl status mysql
If it’s not running, you can start MySQL with:
sudo systemctl start mysql
To ensure MySQL starts automatically at boot, run:
sudo systemctl enable mysqlStep 5: Log into MySQL
Now that MySQL is installed and running, it’s time to log in as the root user. Use the following command:
sudo mysql -u root -p
You’ll be prompted to enter the root password you set during the mysql_secure_installation process.
Once logged in, you’ll see the MySQL prompt, where you can execute SQL commands.
You have now installed MySQL!
Note:
If you didn’t set a password doing the installation (or you set it to blank), you can change your password. Use the commands below one at a time:
sudo mysqlUSE mysql;
ALTER USER 'root'@'localhost' IDENTIFIED WITH mysql_native_password BY 'YourNewPassword';
FLUSH PRIVILEGES;
EXIT;
Remeber to change YourNewPassword with your actual password.
Step 6: Create a New Database and User (Optional)
To create a new database and user, follow these steps:
Create a new database:
CREATE DATABASE my_database;
Create a new user:
CREATE USER 'my_user'@'hostname’ IDENTIFIED BY 'password';- my_user‘: The name of the new user.
- ‘hostname‘: The host from which the user is allowed to connect (use ‘localhost’ for local access, or ‘%’ for access from any host). In this example we will use the % to allow the user to sign in from anywhere.
- ‘password‘: The password for the new user.
Grant privileges to the user:
GRANT ALL PRIVILEGES ON my_database.* TO 'my_user'@'localhost';
Flush privileges to ensure that the changes take effect:
FLUSH PRIVILEGES;
Exit MySQL:
EXIT;
In the future you can now login as follows:
mysql -u my_user -p
Enter the password you created for the user.
Conclusion
Congratulations! You have successfully installed MySQL on your Ubuntu system and secured it for safe use. You can now create databases, manage users, and integrate MySQL with your applications.
If you want to see how MySQL can be used together with PHP and an Apache Webserver, check out our tutorial on How To Install LAMP Stack on Ubuntu.


