How to Set Up Apache Web Server Ubuntu

In this posts, we’ll go through the process of how to set up an Apache web server on Ubuntu, one of the most popular and widely used open-source web servers. Whether you’re a beginner or an experienced Linux user, this step-by-step tutorial will help you install, configure, and manage Apache to host your own websites.
By the end of this guide, you’ll have a fully functioning web server ready to serve content to the web. Let’s dive in and get your server up and running!
What is Apache Web Server?
Apache is an open-source web server software that allows you to serve web pages over the Internet. It’s one of the most popular web servers, powering over 25% of all websites today. With its flexibility, security features, and strong community support, Apache is the go-to choice for many developers and businesses.
Prerequisites
Before you start, make sure you have:
- A server (VPS or dedicated) with a Linux distribution (Ubuntu)
- Root access to your server or a user account with sudo privileges
- A terminal or SSH client to connect to your server
Step 1: Update Your Server
Keeping your server updated is crucial for security and performance. Run the following commands to update your package index:
sudo apt update
sudo apt upgrade
Step 2: Install Apache
Now, it’s time to install Apache.
sudo apt install apache2
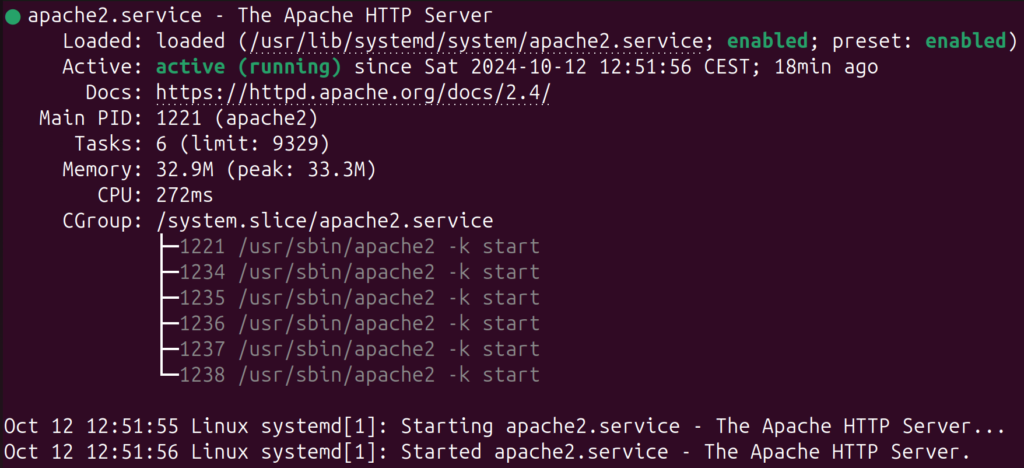
After the installation is complete, you can verify that Apache is running by entering:
sudo systemctl status apache2
Step 3: Start and Enable Apache
To ensure that Apache starts automatically when your server boots up, run the following commands:
sudo systemctl start apache2
sudo systemctl enable apache2
Step 4: Configure Firewall Settings
If you’re using a firewall (which you should!), you’ll need to allow traffic through port 80 (HTTP) and port 443 (HTTPS). Here’s how:
sudo ufw allow 'Apache Full'Step 5: Test Your Apache Installation
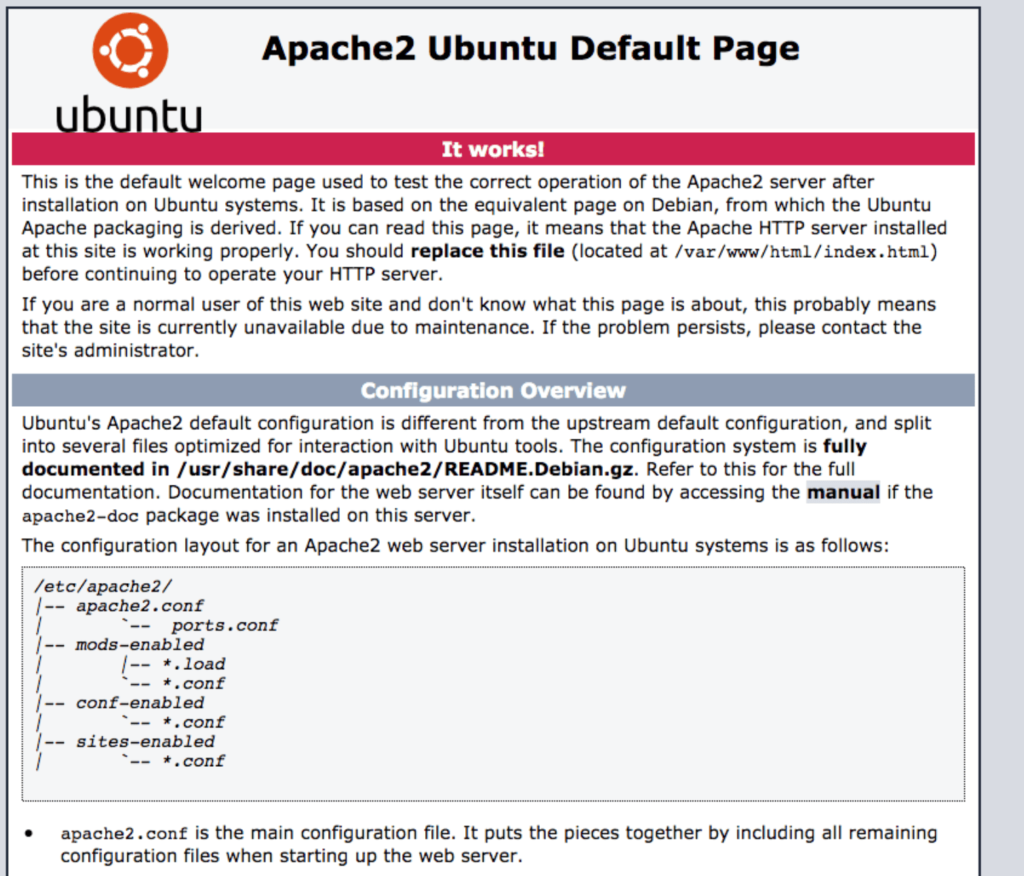
Now that Apache is installed and running, let’s verify that everything is working correctly. Open your web browser and enter your server’s IP address:
http://your_server_ip
If Apache is running, you’ll see the default Apache welcome page, which confirms that your web server is up and running!

Step 6: Styling Your Website
As we saw in the earlier step, our website currently just displays. If we want to add our own content this can be done by adding files in /var/www/html directory.
Lets first see the content of what is currently in that folder.
cd /var/www/html
Run the ls command to see the files in the folder. Now, we currently only see the index.html file, which is what serves us the default Apache welcome page we saw in step 5.
If we want to make our own website (which we will), we can change the content in the index.html file.
Delete the content in the index.html file and add the following:
<!DOCTYPE html>
<html lang="en">
<head>
    <meta charset="UTF-8">
    <meta name="viewport" content="width=device-width, initial-scale=1.0">
    <title>My Simple Website</title>
</head>
<body>
    <h1>Welcome to My Simple Website</h1>
    <p>This is a very basic webpage with just one page.</p>
    <p>© 2024 My Simple Website</p>
</body>
</html>
Now you should see a website similar to this one:

Step 7: Configure Virtual Hosts (Optional)
If you plan to host multiple websites on your server, you’ll need to set up virtual hosts. This allows Apache to serve different content based on the requested domain name.
Even if you don’t plan on hosting multiple websites, it can still be a good idea to setup virtual hosts.
By default, Apache comes with a basic site enabled (the one that we saw in the previous step (/var/www/html).
With virtual hosts we will create our own folder, which will encapsulate configuration details for our domain.
Remember to replace example.com with your actual domain name.
sudo mkdir /var/www/example.com/
Go to that file location.
cd /var/www/example.com/
Assign the ownership to your current user.
sudo chown -R $USER:$USER /var/www/example.com
sudo chmod -R 755 /var/www/example.com
We will create a simple website that we can use to play around with. You can always update the code later.
Create a new file index.html in this folder.
sudo nano index.html
Paste in the following code.
<!DOCTYPE html>
<html lang="en">
<head>
    <meta charset="UTF-8">
    <meta name="viewport" content="width=device-width, initial-scale=1.0">
    <title>My Simple Website</title>
</head>
<body>
    <h1>Welcome to My Simple Website</h1>
    <p>This is a very basic webpage with Virtual Hosts Enabled.</p>
    <p>© 2024 My Simple Website</p>
</body>
</html>
In order for Apache to serve this code, we need to create a virtual hosts file.
Go to this directory and create a new file.
cd /etc/apache2/sites-available/
sudo touch example.com.conf
Add the following configuration (replace example.com with your domain name):
<VirtualHost *:80>
    ServerAdmin admin@example.com
    ServerName example.com
    ServerAlias www.example.com
    DocumentRoot /var/www/example.com/public_html
    ErrorLog ${APACHE_LOG_DIR}/error.log
    CustomLog ${APACHE_LOG_DIR}/access.log combined
</VirtualHost>
Enable the new virtual host:
sudo a2ensite example.com.conf
sudo systemctl reload apache2
Disable the default site defined in 000-default.conf:
sudo a2ensite example.com.conf
Finally, restart Apache.
sudo systemctl restart apache2
Apache will now be serving your example.com instead of the default site. Try accessing your website again, and see the changes. It should look similar to this:

Step 8: Secure Your Server with SSL (Optional)
To secure your website with HTTPS, you can use Let’s Encrypt to obtain a free SSL certificate.
Almost all modern websites use HTTPS, since it allows for secure and encrypted communication over the internet.
Install Certbot:
sudo apt install certbot python3-certbot-apache
Once Certbot is installed, get an SSL certificate for your domain:
sudo certbot --apache -d example.com -d www.example.com
Certbot will ask you for an email address (for renewal notifications and urgent security notices). You will need to agree to the Let’s Encrypt terms of service.
Automatic Certificate Renewal:
sudo certbot renew --dry-run
Restart apache
sudo systemctl restart apache2
Check the example.com-le-ssl.conf file
Certbot should have created the file example.com-le-ssl.conf in the folder /etc/apache2/sites-available/example.com-le-ssl.conf. Lets check it has been configured correctly. Again, remember to change example.com with your actual domain.
Open the file:
sudo nano /etc/apache2/sites-available/example.com-le-ssl.conf
The file might contain something already. If it’s empty, just paste in the following, if it isn’t empty, remove the content and paste in the following:
<VirtualHost *:443>
	ServerAdmin admin@example.com
	ServerName example.com
	ServerAlias www.example.com
	DocumentRoot /var/www/example.com
	ErrorLog ${APACHE_LOG_DIR}/error.log
	CustomLog ${APACHE_LOG_DIR}/access.log combined

Include /etc/letsencrypt/options-ssl-apache.conf
SSLCertificateFile /etc/letsencrypt/live/example.com/fullchain.pem
SSLCertificateKeyFile /etc/letsencrypt/live/example.com/privkey.pem
</VirtualHost>
The final thing we need to do, is to go back to the file /etc/apache2/sites-available/example.com.conf, and add a redirect command.
This will redirect all attempts to access http://example.com to https://example.com.
Open the file:
sudo nano /etc/apache2/sites-available/example.com.conf
Add the following highlighted line:
<VirtualHost *:80>
    ServerAdmin admin@example.com
    ServerName example.com
    ServerAlias www.example.com
    DocumentRoot /var/www/example.com/public_html
    Redirect permanent / https://example.com/
    ErrorLog ${APACHE_LOG_DIR}/error.log
    CustomLog ${APACHE_LOG_DIR}/access.log combined
</VirtualHost>
Now, try to access your site again. You should see that even though you may try to access http://your_server_ip, you will be redirected to https://your_server_ip.
Conclusion
Congratulations! You’ve successfully set up your Apache web server, virtual hosts, SSL and configured it to serve your website.
By following these steps, you’re well on your way to launching your online presence. If you want to explore web development further and how Apach can be used together with PHP and MySQL, check out our tutorial on How To Install LAMP Stack on Ubuntu.


